Thursday, June 30, 2011

radishes, butter, salt, bread

this is a super quick snack or light lunch - bread, then some good quality butter, then thinly sliced radishes, then a goodish sprinkling of a nice flaky salt. that's all you need for a rather elegant little repast.

i used a salt called murray river apricot salt, which is australian for fancy salt. it does sound fancy, but it isn't that expensive when you just use it for sprinkling on things. they have it online at lots of places and in austin i got it at central market and here in portland at zupan's. so it's around and all.

Wednesday, June 29, 2011

very cherry hand pies with ginger and lemon

don't those little pies just make you swoon? there's something so summery about little baby pies you can eat out of hand. they are perfect for picnics, since you don't need utensils. however, they are also perfect for eating at home or at work or really wherever you might want a tiny pie pick-me-up.

luckily, they are also quite easy to make, since the crust is simply store-bought puff pastry. of course, technically one could make one's own puff pastry, but really it's kind of too hot for that nonsense.

these are very similar to the ones in this month's bon appetit (see recipe here). however, i took the liberty of adding the zest of one lemon and a couple of tablespoons of finely diced crystallized ginger. i also used frozen cherries for the most part but added a few fresh cherries at the end of cooking the filling. next time i might try using a little less cornstarch, like a tablespoon instead of 1 1/2, because i felt like the texture was a little gummy. but when you use less cornstarch it will make the filling set up less, so they may be more messy. i think i would also use lemon juice to mix with the cornstarch instead of water, just to add a little more acidity and flavor.

i do think that the lemon and ginger were great additions, since they added a little brightness and spice. however, i'm sure that making them as the recipe is written would result in excellent pies as well. also, our grocery store didn't have all-butter puff pastry, so i used the prole pepperidge farm kind. luckily it still worked. it actually made more pies than the recipe states as well - bonus!

follow the basic recipe for the filling, adding the grated zest of one whole lemon and a couple of tablespoons of minced crystallized ginger when you add the cherries. i don't think you have to use the dried cherries, but i definitely think it's a good idea. they have a different texture and more intense flavor than the fresh or frozen ones. you could also use other dried fruit such as cranberries or blueberries for a different berry boost.

if you use the pepperidge farm puff pastry (it seems to be the only one available in many stores), let it thaw and then roll it out when your filling is cool - i rolled it on a large cutting board, which makes cleaning up easier. when you unwrap it, it is folded over a couple of times so when you unfold it there are three rectangle-y sections. i cut the pastry along the fold lines and then cut each of those in half so that instead of three long rectangles, there are six shorter ones. then follow the recipe and brush with egg (i used a whole egg with a little water because what are you going to do with just an egg yolk?) around the edges so it will seal more easily. if you don't have a pastry brush, you can do as i did and just dip your fingers in the egg and brush it like that.

then just dollop on some filling, fold one end over, and press the tines of a fork lightly around the edges to seal. then brush the egg wash over the top and sprinkle with some sugar. the recipe calls for fancy sugar, which would definitely be a little prettier and more sparkly, but i used regular-people sugar and it was totally fine.

i put them in the freezer to cool (because our fridge was too full - it wasn't out of some kind of ideological impulse - but it worked well) and waited until after they had chilled to cut the vents in the top. i think this made it easier to cut them, because otherwise the pastry is soft and it's hard to get good cuts. then just bake those puppies as the recipe suggests and bring them to a picnic!

our picnic sadly lacked a piñata, but we did have a bunch of pies, so i guess it evens out...

you can also eat them at home and use a plate, but where's the fun in that?

actually, it's still pretty fun, even indoors and on a plate.

Monday, June 27, 2011

gin/ginger/mango/pineapple punch

punch is a fun thing to make for any gathering of friends. it can be as complicated or simple as you want (i am fond of the idea of having sherbet in punch, but it seems like that doesn't happen as much as it used to).

the genesis of this particular punch was the fact that mangoes and pineapple were both on sale at safeway. it's not much, as creation myths go, but it is the truth.

first you must get some jars together (or, if you are fancy, get out your pitcher) and then you should cut up some coins of ginger (i just wash it and cut it up with the skin still on). for three largish (like spaghetti sauce jar-sized) jars, i used perhaps 2 inches of ginger root, cut in pretty thin slices. then cut up the pineapple (for instructions on that, see rhubarb-pineapple crumble) and the mango.

mangoes seem to intimidate people sometimes. when i was buying this one, there was an elderly fellow in front of me buying like a dozen of them and he was talking to the cashier about what a pain they were to cut up. apparently he was peeling them first and then trying to cut them, which to me sounds like an exercise in slippery fruit, futility, and sliced fingers. it is much easier to cut them up with the peel still on them, then cut the pieces out of the peel.

mangoes are sort of flat on two sides and if you use a sharp knife and hold the fruit so that the stem is facing up, you can cut down on either side of the pit. these are the larger oval pieces above. then there are just the two smaller side pieces and you're almost done! then just make hatch marks as above, push the skin in so that the flesh goes out as in the bottom part of the picture, and use a small knife to cut the little cubes off. so easy! and it's already cubed for you! i used a whole mango and almost half of a pineapple.

then just put the fruit and ginger in with some gin to soak. i let it soak on the counter for a good couple of hours - this infuses the gin with the fruit flavor and infuses the fruit with the gin. i used about a liter of gin in total - just try to get all of the things evenly distributed, if you are using more than one vessel.

after a couple of hours (and i'm sure it would be fine if it was longer than that), add some soda or similar. i used one bottle of grapefruit italian soda and then added some sparkling water to each glass as it was poured (the picture at top is post-italian soda addition). this made for a not-too-strong and very refreshing summer cooler.

we enjoyed it while picnicking and playing bocce ball, which is the preferred way to enjoy it, but it wouldn't be too bad if you sipped it at a cookout or similar.

isn't summer just the best?!

Saturday, June 25, 2011

southernish cornbread panzanella

salad for dinner is the epitome of summer. after a couple of years away from texas, a summer salad dinner still feels right. even in portland's not-deadly-hot clime, there's something about a full-meal salad that woos me every summer.

a perfect salad-meal has a few requirements: leaves/vegetables, protein, carbohydrates, good dressing. if you are missing one of these four cornerstones, your salad will be a sad disappointment and you will wish you had just gone out for dinner.

this salad is a southern-style panzanella-esque meal that fulfills the 4 requirements perfectly - lettuce (here, romaine and a butter lettuce/radicchio mix, but you can use whatever hearty greens you have), cucumber, tomatoes, scallions, sweet onion, bacon, blue cheese (here, gorgonzola), cornbread, and a ranch-style buttermilk dressing with lots of fresh herbs. the best thing is that ingredients can be changed out with relative impunity as long as you have those four bases.

i would actually recommend that you purchase some cornbread for this, if you can find any worth your time. i made some in the toaster oven so as not to heat up the house too much, but really, who wants to bother with that? if you buy some cornbread that some other sucker made for you, you are ahead of the game. otherwise, use whatever you like (i like homesicktexan's, since she knows that in the south cornbread is not sweetened).

then you kind of treat the cornbread as if you are making croutons - i hacked it up into smallish pieces (actually, it's nice to have some craggy bits involved - it gives a better texture - you don't want it all to be perfect little squares) and dried it out in the toaster oven (although this could also be done in an oven - maybe 300-350, turn them occasionally for 20 minutes or so until they are dry and deliciously crustish).

this dressing is something like ranch. it has buttermilk (about a cup) and mayonnaise (about 1/3 cup, but you can use more or less to your taste and liking of thick dressing) and a little cider vinegar (about a teaspoon) and a clove of garlic, the zest from half a lemon, and a whole lot of herbs.

here in portland, one can procure fresh herbs in bulk, so it's easy to get a bunch of different things for a dressing like this. if you are in a place that makes you buy all of your herbs in little $3.99 thingies, though, for god's sake don't use this many herbs. of course, if you are totally on the ball and growing these little beauties in your backyard or patio, by all means use whatever you have on hand. in the photo above, italian parsley is in the top right corner, then going clockwise there is cilantro, garlic, lemon zest, rosemary, oregano, tarragon, thyme, and some chives in the center.

i did the garlic and the lemon zest on the microplane (though otherwise you could just chop both really fine) and mixed those with the buttermilk, mayo, and vinegar and a good amount of salt and pepper. don't be shy about these. then i chopped all of the herbs up together (after taking of the woody stems of those that needed it, like rosemary, oregano, and thyme) and threw them in and let it all get cozy for awhile. it's good if you can make the dressing at least a few hours before you have the salad, just so the flavors meld. but it will still be good, even if you can't. i like making dressings in a jar so you can just shake it all together, but you should feel free to do whatever you want. i am not the boss of you.

then it's simply a matter of cooking the bacon (i used our neighborhood do-goodery's free-range turkey bacon, although probably the real stuff would be excellent as well), slicing some vegetables, and putting it all together. oh, and making, if you like, some onions that i am calling "dry-pickled" (that's not really a thing, and pickling is not exactly what you are doing, but whatever).

the onion i used was some kind of small, sweet one. if you're in the northwest, something like walla walla is both tasty and fun to say. if you're in texas, a 1015 will definitely work. if you are elsewhere, as so many are, use your best judgment. so i had half an onion and sliced it thinly. then i massaged it with about a teaspoon of kosher salt and a teaspoon of sugar and let it sit for an hour or so. this is kind of like what happens when you make the pickles that go on banh mi - it softens the onion and mellows its flavor and makes it super good.


so. salad greens and vegetables washed and prepped, cornbread croutons dried and ready, bacons crisped and tasty - just plonk it all together (or, if you want it to be fancy, dress the greens lightly, then toss the cornbread with a little dressing, then put it nicely on a plate, then add the other vegetables and a little more dressing, then bacon and blue cheese as a crowning glory). this is a satisfying and delicious way to have dinner without significantly heating up your kitchen. you can even toast the croutons the night before and have them ready when you want dinner.

other options with this salad would be smoked salmon instead of bacon, the addition of some rotisserie chicken instead of blue cheese, or a poached egg instead of something. as long as you remember to have the 4 main ingredient categories, you can't go too far wrong.

Friday, June 24, 2011

japanese baked chicken katsu curry

somehow i never had japanese curry until last summer, despite my abiding love for all things curry. it was a revelation and now i crave it regularly. while i also love indian and thai curries, there's something different and particularly addictive about the japanese style. it's kind of sweet, but not in a coconut milk way. it's spiced, but not spicy. i don't know - basically it's just really good and i wish i was eating some right now.

as the wikipedia link mentions, you can certainly make it from scratch, but people often use mixes.* i got this one from uwajimaya, which is an awesome asian market with all kinds of stuff, but it should be available at any asian market or at some supermarkets. i don't know that this is the best one around, but it was good enough for us. here is a link to a taste test of some - i will probably try another next time.

the traditional vegetables to put in the curry are potatoes, carrots, and onions (my onion was a farmer's market one, hence the little round slices at bottom right). i also added a sliced jalapeño this time and another time when i made it i used a small sweet potato as well. it's totally simple - just cut up the vegetables, as above, then cook the onion for a couple of minutes until it's translucent. then add the others and add however much water the curry roux box tells you to add. for mine, it was 3 cups of water for 1/2 the package. the curry comes in little blocks that you break up into the vegetables/water mixture once the vegetables are softish and basically done. then it thickens up and makes your house smell amazing.

you can add some kind of protein to the vegetables you use and have the whole thing over rice or noodles (which would be the best 15 minute meal ever), but i like making a version of chicken katsu to have with it. the curry can just sit for a bit while you make the chicken katsu, if you're doing that, or there is plenty of time to make that part while the chicken is baking.

usually katsu (which can be pork, beef, ham, chicken, etc) is breaded and deep-fried. i am kind of scared of deep frying things, and i don't have a thermometer for that kind of business, so i decided to just bread and bake some boneless skinless chicken thighs. Thighs are good for this because they are less likely to dry out than breast meat. also they are usually pretty cheap, even when you spring for the ones that are humanely raised and slaughtered.

the first time i made this i put the chicken into a plastic bag and smacked it a bit with the bottom of a heavy pan - i was trying to make it flatter so it would cook more evenly. i still think this is a good idea, but the next time i made it i didn't do that and we still ate it with gusto. so, your choice.

then you need to dip each piece in seasoned flour - just some salt and pepper will do. then have your station set up so you can dip into beaten egg (i used just one normal egg for a little over a pound of meat), then into seasoned (s+p again!) panko bread crumbs. the panko ones are great for this because they are bigger and scragglier than regular bread crumbs and they crisp up really well. i guess you could use regular bread crumbs, but panko is everywhere now so you should be able to find it easily in the supermarket (by the prole bread crumbs, probably. or in the asian section).

then just put them on a baking sheet and stick them in the oven for about 40 minutes or so. it depends on how thick they are, really. if you have a meat thermometer, use that to check the thickest part of the meat. otherwise, just cut into it and see if it is raw. if it is, cook it more! if this approach makes you nervous, probably you should spring for a meat thermometer.

you should probably make some rice at some point, too. we used jasmine rice that i just tossed in the rice cooker (best. invention. ever.), but you can use whatever kind.

sadly, i don't have a picture of the finished dish. this is for a number of reasons, such as that it was dark when we finally ate and also it is hard to take a picture of brown curry and vegetables and chicken and have it look pretty. so let's just say it looked exactly like this:

(imagine a very pretty katsu curry dish)

anyway, you get the idea. rice, vegetables in amazingly delicious curry sauce, crunchy chicken. it is the new favorite meal of our household and we love it lots. maybe you will as well!

*i should note that my friend who is half japanese was pretty strongly insistent on the need to make the roux yourself. but he has never given me a recipe to do so, so until that happy day comes, i'm sticking with this.

*ingredients* for like 6 servings? it depends on how hungry you are.
curry
1 large onion (or two medium ones or whatever)
4 small carrots (or like 2 carrots and some sweet potato, etc)
some potatoes - i used four mediumish ones
jalapeño (optional)
1/2 package japanese curry roux mix

baked katsu chicken
~1 pound boneless, skinless chicken thighs
~ 1/3 cup flour
salt and pepper to taste
1 egg
~ 1 cup panko bread crumbs (this is inexact, obviously, but you just want to really coat them well with the crumbs)

Wednesday, June 22, 2011

spicy-sweet carrot-ginger jam/chutney

carrot jam is wonderful.

you can have it on toast. you can have it in a cocktail. you can make it into salad dressing. you can do that thing where you put it all over some goat cheese or cream cheese, like people do with jalapeño jelly in texas.

whatever you want to do with it, make it today!

this is how i cut up the carrots. i used 6 medium-sized carrots, which made like 3 cups-worth when diced. something like that, anyway. but yeah, you should dice them up. or you could probably use a food processor or grater or even buy pre-grated ones, if you like. i like the texture of the diced ones, though, and felt like chopping, so i went old school with it.

this shows all the spices i used. i think it is barely legible if your eyes are young or your computer is large. however, you can also look at it here. it is much better and easier to read that way.

you definitely do not have to use all of these spices. if you have them all, great. otherwise, use what you have. i happened to have lots of ginger, so i used powdered, fresh, and crystallized. one could also just use one of these. also, instead of ras el hanout and za'atar, you could use more cumin and cinnamon and maybe some dry thyme and/or oregano. it won't be exactly the same, but it should still be good.

by way of measurement, it's more a proportional thing, but that's a pretty small plate, so it was about a teaspoon or so of the larger amounts of spices, and maybe a tablespoon and a half of the crystallized ginger and like 1/4 - 1/2 teaspoon of coriander. i also used 1/4 of a lemon, cut up into smallish pieces (skin and all) and 1/4 - 1/3 cup of brown sugar. finally, i put in a few grape tomatoes, cut in 1/4s (maybe 8 or 9 tomatoes).

the main point is that this can be as complicated as you want - if you just want to make it with a few spices and no tomatoes, i think it would still be good. you could also add dried fruit if you like that sort of thing.

so. once you have all of your stuff chopped up and your spices gathered, heat up a smidge of oil in a saucepan (medium heat). then add the garlic and fresh ginger, if you're using that. after 30 seconds or so, add the spices and let them toast for a few seconds. things will start smelling exciting and exotic.

then add the carrots, sugar, lemon, tomatoes, etc. also some water - enough to cover the other ingredients, but not too much more than that. turn up the heat until it boils, then turn it down to medium-low and let it cook, stirring occasionally, until the carrots are super tender and everything is nicely cooked down.

mine took a couple of hours or maybe an hour and a half or so. don't let this intimidate you though! it is mostly time in which you are not doing anything in particular with the carrots. you can watch an episode of murder, she wrote or read your new issue of sunset magazine or otherwise behave like an old lady. or you could do something hip. the old lady stuff's just what i did. you only have to stir it every 15 minutes or something. also you may need to add a little more water at times, if it is looking too dry. it's not a big deal.

once the carrots and lemon are soft and the tomatoes have kind of melted into the other stuff, use a potato masher to smush everything together. the lemon will be all soft and will just mix in with everything else easily. you can also use a food processor or immersion blender if you are not poor like me. although i do like the texture you get with the potato masher.

then let it cool and put it in a jar in the fridge. it should keep at least a week or so, i imagine.

and yes, i did put it in a gin & tonic and yes, it was delicious.

for a nice salad dressing, add a tablespoon of carrot jam to a couple of teaspoons of olive or other oil and a teaspoon or so of dijon mustard. add water to thin it out and that's it! it's good on those salads with cheese in them - like goat cheese or blue cheese and walnuts.

it would also make a fine sandwich spread for turkey or duck or a salmon burger or things of that nature.

you can also just eat it out of the jar.

Thursday, June 16, 2011

(winner, winner) roast chicken dinner

oh yessss. everyone (everyone who eats meat, anyway) loves roast chicken. if you don't, you're doing it wrong. it is elemental comfort food at its best and it couldn't be easier. all you need is a) a chicken, b) some salt and pepper, c) a hot oven and d) other seasonings, if you want.

this was the last of our csa chickens, and i will miss having them in the freezer, but they got too expensive so this will be our last chicken dinner for awhile until i find somewhere else to get the free range ones that they humanely hug and kiss to death.

you can use any kind of seasonings you want - sometimes i use za'atar and sumac, sometimes rosemary and orange, sometimes smoked paprika and cumin and lime. this time i wanted to keep it simple so i used salt, freshly ground pepper, the zest of a whole lemon, and 4 medium cloves of garlic. the garlic and lemon were given a quick treatment with a microplane and then it all just gets mixed together.

you don't want to skimp on the salt here - for a smallish chicken (~3 1/2 pounds) i used maybe 2 teaspoons. it is pretty important to use kosher or some other coarse-grained salt, as it has a much better flavor and something about the larger crystals just makes it all-around better. i don't even have any regular table salt - i use kosher for basically everything. before you start messing with the chicken, you must turn on the oven to 450 - you want it nice and hot.

i don't have one of those fancy roasting rack thingies, so i use a collapsible steamer basket. it's kind of dumb, because it slips around and makes things a little precarious, but i like that it keeps the chicken off the bottom of the pan so all the skin gets crispy. clearly, if you are in possession of a roasting rack you should use that. or you can just leave it in the pan and it will still be good. just not as good.

here is where it gets a tiny bit gross. you have to rinse the chicken off and pat it dry with paper towels. you really want to get it nice and dry, since that helps the skin get all crispified. then you have to get the lemon/garlic mixture under the skin. here is a handy video that shows you how (albeit with butter). my first thought when watching this video was wow that is a lot of butter. my second thought was ZOMG that chicken still has feet! i am so glad the csa people took the feet off for me. i acknowledge that i am eating a chicken, but i really don't need to see its little feet.

so anyway, you could put butter under there too if that's your thing. but i never do and it's always plenty moist. but basically just hold little bits of the lemon mixture and stuff them under the skin and try to get them evenly through there. then shower a bit more kosher salt and pepper over the top and stick it in the oven.

i started it at 450 and turned it down to 425 after 25 minutes or so. this sort of depends on the size of your chicken and how fast it is browning. then cook it until a meat thermometer stuck in the thigh but not touching the bone registers 165 (the USDA's recommended temperature). this one took about 45 more minutes after i turned the heat down. i have read that a good rule of thumb is about 20 minutes of cooking per pound. also, when it is done the juices should run clear. also there is something about the leg wiggling easily. if it starts getting too brown before the temperature is high enough, put a piece of tin foil over the top, just resting on it lightly.

not to be all boring and USDA about it, but really you should just suck it up and get a meat thermometer so you will know for sure. food poisoning is no fun, and eating delicious roast chicken is meant to be a joyful experience.

oh, i also roasted some little potato wedges at the same time. they were pretty thin, so they took maybe 15 minutes or a little more. just put them on a pan with some oil (or you could get crazy and pour some chicken juices on them if you are especially dexterous) and salt and pepper and flip them when one side is brown. then take them out when they are done.

when the chicken is done (165!), take it out of the pan (still on the steamer basket) and let it sit on a thing with a little tent of aluminum foil over it. then you can pour off the juices in the pan, skim the fat from them (i pour the juices into a cup and use a spoon - it doesn't have to be all perfect), put the rest back in the roasting pan, and add juice from 1/2 a lemon and scrape up any bits that are clinging to the pan. you can also add a knob of butter or some dry vermouth at this point, depending on how simple you want the enterprise to be. put it back in the oven for a couple of minutes or over a burner on low/medium, so that it thickens up a little bit.

we had this with a simple green salad, the aforementioned potatoes (both of which, plus the chicken, had the pan sauce poured over them), and this delicious brown bread i made that i will do a thing about soon. this is a great sunday kind of dinner, but it's also fairly hands-off, so it works on weeknights too. also, leftovers are amazing in sandwiches the next day.

*ingredients*
1 whole chicken
zest from 1 lemon + juice from 1/2 a lemon
4 garlic cloves
salt
pepper

Wednesday, June 15, 2011

raspberries, citrus, tonic, tequila

i ordered a tequila & tonic at our neighborhood bar recently and the bartender was taken aback. i didn't know it was such a weird thing - maybe years of gin & tonics made me realize that everything is better with tonic. but i think i ended up convincing him that it was actually good.

he in turn informed me that when you are buying tequila, you should at the very least buy one made from 100% agave. this was helpful, because i really don't know anything about tequila and actually rarely drink it. but it always tastes summery when i do, and this drink tastes like liquid summer.

all you need are some raspberries (i used frozen ones, but if you have fresh, obvs use those), some lemon, some agave nectar (or simple syrup or sugar - i just liked the idea of agave plus agave and agave nectar mixes easily into cold drinks, unlike sugar or honey), some tequila, and some tonic!

first, muddle the berries and lemon together. for two tall drinks, i used about 1/4-1/3 cup raspberries and 1/4 of a lemon, rind and all. i just smashed them with a wooden spoon until the berries were mostly smushed and the lemon had been broken down fairly well. it's not like it has to be uniform in texture. then add some agave to taste - it depends on how sweet your berries are, etc. i used about 1 1/2 - 2 teaspoons, maybe.

then divide into two glasses, add whatever amount of tequila you are comfortable with, top the glass off with tonic and lots of ice, and imagine yourself on a beach in cozumel or something.

or, in my case, acknowledge that you are in portland and it is still chilly in june and you need a sweater when you sit outside sipping exotic cocktails.

either way.

Monday, June 13, 2011

peanut butter chocolate meta-cookies

cookie party! are there two more beautiful words in the english language? yeah, i've heard that thing about "cellar door"' but frankly i think it's overrated - cookie party is where it's at.

anyway, we had the great good fortune to be invited to a cookie party this weekend (for the uninitiated, it is exactly what it sounds like - everyone brings cookies and eats other people's cookies and drinks beer while ogling the weird "bakon" vodka someone brought and daring each other to try it).

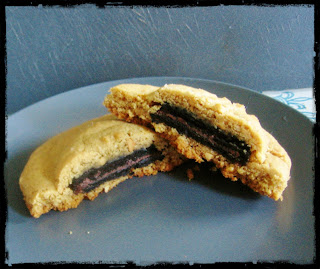
i decided to make meta-cookies, because awesome. i got the idea here, in which they are boringly called cookie-stuffed cookies. i am glad i didn't go with chocolate chip cookies stuffed with oreos, though, not least because someone else at the party made them! it is a trend! also, though, i am glad because i think it would be really difficult to shape them properly if they were full of chocolate chips.

for the peanut butter cookie part of the endeavor, i used this recipe as a base. however, i cut down the sugar a little, added an extra 1/3 cup of peanut butter, and sprinkled the tops with kosher salt (i think all cookies should be sprinkled with kosher salt, for reals). if i had had ground peanuts, you can bet i would have used those for some of the flour or something, too. i don't even like peanut butter very much, but if you are eating a peanut butter cookie it should taste really peanut buttery, is my feeling.

due to the exigencies of meta-cookie-making, i also had to change up the part about chilling the dough - you want it nice and cold for these puppies.

so basically you just make the dough, put it in the freezer for a good 45 minutes to an hour or so (along with the cookies you are using for the inside - i used chocolate trader joe's oreo knockoffs, or "joe-joes"), then start patting. the main thing is to make sure you make each part of the peanut butter dough fairly thin. you should look at the cookie-stuffed cookie thing as a guide, but i found that for this dough, you just need like a tablespoon for each side.

so get about a tablespoon of dough and try to quickly (you don't want it getting too warm) pat/smush it into a round disc. then do that with another one and sandwich your storebought cookie in between them. then pinch around the edges and seal the cookie inside the dough! it seems kind of hard at first, but you will get the hang of it quickly. i have faith in you!

as you finish, put them on a parchment-covered cookie sheet. once it is filled up, stick it back in the freezer (or fridge) for at least another 15 minutes to let the dough firm up again. i didn't do that with the first batch and some of them got a little tumorous when the dough spread out too much in baking, so you could kind of notice the cookies inside more. also you want to (after they are chilled) use a fork to do the little crosshatch things that are mysteriously required of peanut butter cookies. then sprinkle each with a little kosher salt to add a little extra kick that your tastebuds will thank you for.

(i know the ones above are pretty ugly, but the next batch looked much better. also they still were more than edible.)

then bake them for 15-20 minutes, until they are lightly brown on the edges and they start smelling really nutty and toasty. they bake for longer than your typical peanut butter cookie because they are gigantic and they are baking for two. you can bake them for less time if you want them to be extra-soft - these were pretty crispy.

these are definitely not something you want to make all the time, because they are a little ridiculous. but they are fun at a cookie party and they aren't that much of a hassle to make. meta-cookies!

*ingredients & recipe* makes about 2 dozen enormous cookies
1 cup butter, softened
1 1/3 cup peanut butter (i used some hippy one without added sugar, you can use whatever)
3/4 cup granulated sugar
1 cup dark brown sugar (not packed. or pack it. whatever you like)
2 eggs (i used my freaky jumbo eggs, because it's not like i am going to make fried eggs from them, but you can use regular nice eggs)
2 1/2 cups flour
1 teaspoon baking soda
1/2 teaspoon salt (plus extra for sprinkling)

a couple dozen chocolate sandwich cookies. i liked these because they had chocolate filling as well as cookies, so double chocolate!

cream together the butter and peanut butter.
add the sugars and mix on medium/high for a couple of minutes, so it gets all light and fluffy. it's not a bad idea to scrape down the sides of the bowl sometimes to make sure you aren't leaving anyone out.
add the eggs, mixing in between each and then giving it all a good whirl to make sure it's incorporated.
with the dry ingredients, everyone is all "sift together in separate bowl" and that is a totally good idea if you aren't as lazy and dish-averse as i am. i just made sure the baking soda wasn't lumpy and then just added everything to the bowl together without sifting or mixing it first.
then mix just until combined to a uniform texture. you don't want to overdo it.

then put it in the freezer (i didn't even cover the bowl, but you could do that) for 45 minutes to an hour or so - just to get it to a point where it is less sticky and thus easier to work with.

then just do the aforementioned patting and sealing and put them back in the fridge/freezer for 15 minutes or more. this is also when you can turn the oven on to preheat - 350.

bake for 15-20 minutes, then take out, let them sit for a minute or two, then put them on a wire rack to cool. i don't have a real wire rack, so when i need one i take out one of the oven racks. it's probably not the best way, but it seems to work okay. i just slid the parchment with the cookies on it off the sheet and right onto the rack, because they are pretty soft when they're first out of the oven.

it would also be awesome if you were to drizzle some melted chocolate over the top.

ta da!

Saturday, June 11, 2011

pinketty pink dance party cake

I made this cake for a friend's dance-themed birthday party (mostly watching cheesy dance movies while eating delicious pizza and drinking margaritas). i am sad to say that it was something of a disappointment (to me - everyone else seemed to enjoy it. but of course they could easily have just been being nice). but i think it has great potential. that's why this is just a little weekend lagniappe rather than a real recipe - you can gaze upon its rough-hewn splendor and imagine how nice it will be once i mess with the technique more.

i got the recipe from a site that i normally really love, although i have also made another cake from there that didn't turn out well, so maybe i need to just give up on the cake aspect of it.

maybe some of it had to do with the freaky jumbo eggs i was using. although i did adjust for their size in the measurements, there is something truly creepy about every egg in the dozen having double yolks. that is probably why they are not usually called for in recipes. no one needs to see all those conjoined twin would-be chickens staring back at them from the mixing bowl. i don't know - maybe that threw the whole thing off.

the main problem i had with the cake was its texture (not very light) and its relative lack of strawberry flavor (despite being nominally a strawberry cake). i am going to try to fix this by beating the egg whites so they add more lifty structure and using fresh AND freeze-dried strawberries to up the berriness.

good things about the cake were 1) it is CAKE 2) rhubarb curd filling 3) cream cheese frosting.

i dyed the frosting for the top with beets and cocoa (thanks for the idea, beth!) and both worked well, if somewhat luridly in the case of the beets. the design is a little rough because i used a cone of parchment to pipe it on and only had 6 minutes in which to do it. so.

at least it went well with the birthday movie-watching - flashdance and breakin' (we did not, sadly, get around to watching breakin' 2: electric boogaloo, although i have had the pleasure of seeing it before anyway).

Thursday, June 9, 2011

soba noodle salad with sweet potatoes and quick-pickled vegetables

yes, i am afraid that is more rhubarb in the above picture. since it's only around for a relatively short time each year, i tend to use it lots when i can get it. this dish is not all about rhubarb, however, and it shows its more savory side here to good effect.

i wanted to make a cold noodle salad and i thought quickly pickling some of the vegetables would add some nice flavors. i cut up four small carrots, half a stalk of rhubarb, and one small spring onion (though you could use whatever onion you have, or even scallions or shallots). i tried to make the carrots and rhubarb pretty thin, since they don't really cook.

then you want to boil some water - maybe 1 1/2 cups or so, add a tablespoon of sugar, a teaspoon or two of black peppercorns, another teaspoon-ish of coriander seeds, and whatever other spices sound good. fennel or mustard seeds would also be nice, i think. also vinegar - i used like 1/3 of a cup or so of rice wine vinegar, but you could use other kinds (though something like balsamic might be weird, cider or white wine vinegar would be good). let the whole thing boil for a minute or so and then pour it over the vegetables. they can just sit there stewing for awhile - you could even make them ahead and put them in the fridge for a few days. it's good to leave them for at least an hour or so, so they get nice and pickley. you can also add more vinegar, if you want them to be more intense.

they would be good in tuna salad or a slaw. but i used them in this soba salad.
soba noodles are made out of buckwheat, which has a distinctive earthy flavor. you could also use other noodles here, but i really like the soba ones. they should have cooking directions on them, so just cook them and then rinse them in cold water and let them dry a little. you don't want them making your sauce all watery.

for the sauce/dressing, i used 1/4 cup tamari (basically like soy sauce), 1/4 cup rice wine vinegar, 1/4 cup (or maybe more like 1/3 - it's to taste) peanut butter (you could also use almond or cashew butter and it would be great), 2 teaspoons sugar, 1 teaspoon molasses (you could definitely leave this out, but i had it around and i like the dark caramelly thing it adds), juice from 1/2-1 lime, and 1 tablespoon (or so) of sesame oil. i also added some of the pickling liquid - just enough to make it not too salty from the tamari.

then for the rest of the salad ingredients, i used about 2 cups of sugar snap peas that i cut in half diagonally, one jalapeño (or 1/2 or whatever - it's pretty spicy with a whole one), cut as thinly as possible, and two small sweet potatoes.

the sweet potatoes were cut into little 2 inch matchsticks (if matchsticks were thicker and we still used matches for things).
then i cooked them with a couple of teaspoons of olive oil in a skillet over medium heat until they were browned in spots and cooked through. it took about 6 minutes, and they were still a little al dente. i didn't want them to be too mushy.

it's important to not mess with them too much while they are cooking - just let them sit for a few minutes and brown up a little before stirring them. it's also important not to crowd the pan too much - otherwise they will just kind of steam and won't brown.

then you just mix it all together - the potatoes, the noodles, the dressing, and the (drained) pickled and raw vegetables (this mixing is easiest if you just use your hands, actually), taste it, and adjust whatever flavors need adjusting. this is really just a matter of taste. i also added some fresh mint that i cut into little strips. i think fresh herbs really make this. if you don't have mint, basil (particularly thai basil) and/or cilantro are also good options.

this is a great make-ahead dish that would be welcome at any summer potluck or picnic. it will make all those boring potato salads look like worthless crap.

it could be a side for some kind of simple salmon or chicken thing, or you could get a rotisserie chicken and put some of that in here. you could also add tofu to make it more substantial. the vegetables are changeable as well - it just depends on what you like and have around. i think red bell peppers or tomatoes or green beans would all be great.

this is a refreshing and tasty way to welcome summer. it's also nice since it doesn't require you to turn on your oven.

*ingredients*
pickles
1/2 stalk rhubarb
4 small or 2 large carrots
1 small onion or 1 bunch scallions or two large shallots
1/3 cup vinegar
1 teaspoon coriander seeds
1 teaspoon peppercorns
1 tablespoon sugar

salad
2/3 pack soba noodles
pickled vegetables
2 cups sugar snap peas
1 jalapeño (or other spicy pepper)
2 small or 1 large sweet potato
mint/basil/cilantro
dressing

dressing
1/4 cup tamari
1/4 cup rice wine vinegar
1/4 -1/3 cup peanut, almond or cashew butter
2 teaspoons sugar (or more, to taste)
1 teaspoon molasses (optional)
1/2-1 lime
1 tablespoon sesame oil
pickling liquid (optional) to taste

Tuesday, June 7, 2011

refreshing citrus & cucumber soda/cocktail

although i rarely find myself in the company of children, more and more of my friends in other parts of the country are having them and it seems like a drink that is good with or without alcohol would be a hit at any summer party.

if you are a child or are with child, you can make this with sparkling water and still feel like you are drinking something special, rather than making do with another boring soda. if you are a member of the drinking set, you can splash in the liquor of your choice - tequila, gin, or vodka would all each be welcome here.

first, you need to make a citrus syrup. you can use whatever citruses you have on hand - i had lime, lemon, and what i think was a tangelo. something like grapefruit would also be good.

get the rind off the citrus with whatever kind of removal thing you may have - the one in the picture below was like $2, i think, and it makes nice long peels, but you can also use a vegetable peeler - just try not to get any/much of the bitter white pith along with the rind.

this was all the citrus i had (one of each fruit), but i think if you have more, it couldn't hurt to add it. but this was good anyway. or you could cut down on the sugar and water a bit and just make a little less syrup.

now all you do is put the rinds in a pan with sugar and water (i used a cup of each) and put it on high and once it boils, stir it a few times and let it boil for about 5 minutes or so. then let it cool and you can either remove the rinds or just leave them in there. i left them in.

then once it's all cooled, all you have to do for the drink is muddle together some lemon/lime/orange slices (i used 1/4 of a lemon), some cucumber (just a couple of slices), and some mint.

add however much syrup you want (depending on how sweet you'd like it - i used maybe 1 1/2 tablespoons for one large glass). then you can add booze, if you'd like. i won't tell you how much to put in; let your conscience be your guide. then top the whole mess off with club soda or sparkling water and go drink it outside while reading a magazine (or continue your beach party or cookout).

aah, summer!

*ingredients*
syrup
rind from 3+ citrus fruits of your choice
1 cup sugar
1 cup water

drink
1/4 of a citrus fruit
3 or so slices cucumber
1-2 tablespoons citrus syrup
sparkling water/club soda
liquor of your choice (optional)

Monday, June 6, 2011

polenta lasagna from pantry & freezer

who doesn't love lasagna?! it's endlessly customizable, not inherently unhealthy, and easily made vegetarian. there is nothing wrong with regular lasagna, but this dish is nice because replacing the noodles with polenta discs enables you to avoid dealing with a ricotta layer and thus removes one more step in your path to stuffing your face. it is also conveniently gluten-free, for our digestively afflicted brethren.

also, all of the ingredients except the mozzarella and parmesan can come right out of your freezer and pantry (and actually i think you can freeze those as well if you like) - you can have all the stuff for this on hand and it comes together super-quickly and can be made ahead and baked later - perfect for a weekday/workday dinner!

the leftovers are wonderful for lunch the next day as well.

so yeah, this is dead easy. i use one of those polenta tube thingies, but you could also use homemade polenta, of course. that makes it significantly less simple, however.
i cut the polenta into 12 even slices. next time i think i would cut them thinner - maybe try to get like 15 or 16 slices out of it. that's just personal preference, though.

then i used about 2/3 of a package of part-skim, low-moisture mozzarella. i would also use a little less cheese next time - maybe more like 1/2 a package (the package was 1 pound) and would cut it more thinly. that's also just up to you and how much you enjoy large bites that are primarily cheese.

also you want to grate some parmesan - maybe half a cup or so is probably all you need.

you also need to get the spinach under control. we don't really eat much meat (i will eat free-range chicken occasionally, and i eat some fish, but that's it), so i made this vegetarian. you could definitely use some sausage or something, though, and cook it in the pan before cooking the spinach and layer it with the rest of the stuff. but i think you definitely want spinach, regardless. spinach is delicious!

i used a large bag of frozen spinach - just put it in a big pan over medium heat until it is not frozen anymore. i let it cook a little bit beyond that (for maybe another 3 minutes or so), then let it cool a little and squeeze out as much water as you can (without getting too obsessive about it). i also added a little salt and some pepper flakes to it at that point.
preheat the oven to 375.

now you are ready to layer! i used a smallish square pan and wasn't all that fussed about making sure the polentas fit in there perfectly. after a little sauce on the bottom, i placed some of the polenta discs in, then put some mozzarella over those, then spinach, then a little dusting of parmesan. then you just repeat until you run out of stuff. i ended up with two main layers of polenta and spinach. it all kind of melds into deliciousness anyway, so don't worry too much about making sure everything's super-even. i used most of the parmesan on the top, so it got a nice crust.

i baked it for about 45 minutes, turning it around in the oven after 25 minutes. i don't know if that turning it around thing really does anything, but it makes me feel better.

then you really must let it sit for a good ten minutes or so so it can set up a bit. this gives it more structure when you cut it and ensures that you don't totally burn your tongue off.

every time i make this, i am like, "why don't i make this every day?" and yeah, i might get tired of it, but it is seriously good and easy and nice. you should make it today!

or after the next time you go to the store.

*ingredients*
1 polenta tube
1/2-2/3 pound mozzarella
< 1 jar pasta sauce (i used about 3/4 of a jar or a little more)
~1/2 cup (+) grated parmesan
1 bag frozen spinach
it really does taste like more than the sum of its parts. and you can add all kinds of stuff to it - i think sausage, other veggies, different cheese, etc., would all be welcome additions.