Showing posts with label quick. Show all posts

Friday, September 14, 2012

creamy corn soup with zucchini & tomato


first off, please excuse the weird illustrations. i neglected to take any pictures of this delicious soup and so had to draw some things on my phone. this is not quite as easy as you'd think.

nevertheless, hopefully they won't put you off making this soup, because it's quick, easy, and remarkably delicious. mike said that i could make it every day and he wouldn't complain (the subtext of that being that generally he DOES complain. just kidding! he is very easygoing, though he will suffer neither mushrooms nor fools gladly).

the corn here is amazing right now, so it would be great to snap some up and make this asap. out of corn season, i think frozen corn would be okay, but fresh is the only way to go when it's as juicy and sweet as it is now. zucchini and tomatoes are also pretty terrific, making this the epitome of the seasonal! local! eating! thing that everyone's always yapping about.


i also added some leftover grilled salmon, but you could also use chicken or tofu to add protein and bulk it up a little. it's also great with just the vegetables. so adaptable!

first, cut the kernels off of 4 ears of corn. this post regarding a tasty corn salad has a thing about cutting up corn, in case this is foreign to you. then put the cobs in a large pan with about 4 cups of milk. i used 2%, since that's what we keep around for coffee, but whole milk would of course be more decadent and skim more ascetic, so go with your instincts. heat the cob-milk mess over medium-high heat until it starts edging towards boiling, then let the cobs sit in there while you do the rest of the things. i think this just gives the end result a deeper and more complex flavor, but obviously if you're using frozen corn it'll presumably not come with cobs and should still be fine, so if you don't want to mess with this step, just skip it! it's your corn soup party! do what you want!


it's not in the picture, but you should cut an onion into smallish dice. heat up a bit of olive oil in a large saucepan over medium heat and add the onion. also chop some garlic into little bits. you can even cut the zucchini and tomato into bite-sized-or-a-little-smaller pieces at this point as well, if you're one of those fancy people with enough room on your cutting board to do so. 

so the onion starts getting translucent fairly quickly and then you can add the garlic and some herbs. i used a small bunch of lemon thyme stems that still had a few leaves on them. it was maybe like 1/2 the size of my thumb (i like to think that i have normal-sized thumbs, if that measurement was unclear) and i changed out the rubber band holding it together for one of those wire bread bag wrapper things from which i removed the paper. maybe you have some kitchen twine or something? just don't melt rubber into your soup and you'll be okay.

i also added a couple of big pinches of dried fines herbes, but pretty much anything not too weird would go well here - marjoram, chives, a little tarragon... (so, like, the things in fines herbes)

then throw the corn in, along with the milk in which the corn cobs have been steeping (sans cobs, obvs). probably some salt and pepper wouldn't be too out of place, either. bring it to a low boil and then turn the heat down to medium-low, so it keeps simmering. let it go for 20 minutes or so. 

at this point i like to blend some of it (like 2/3) up so that the soup has a thicker, creamier texture. you could blend the whole thing like crazy, but i prefer it with some whole kernels. an immersion blender would be best here (avoiding the thyme bundle), but i broke mine a few years ago in an ill-fated margarita disaster, so i made do with the food processor (a regular blender would be better than the processor, leakwise, but i don't have one). 

finally, brown the zucchini in a little olive oil, add some cumin and then the tomato, then add the whole thing to the now-blended soup. ta da! if you have some cooked fish or chicken you could flake/shred/chop it and add it so that it heats through.


don't eat the little bundle of thyme, if you used one.

somehow this ended up tasting almost kind of coconut-y - i guess maybe from the sweetness of the corn? i did use some really superlative corn, so that definitely helps the end result. 

*ingredients*
4 ears corn
4 cups milk
1 small bunch thyme - lemon thyme is particularly good (or some dried thyme)
other herbs
1 onion
3 or 4 cloves garlic
1 zucchini
1 tomato
1/2 teaspoon cumin (optional)
cooked fish or chicken (optional)

listening to: my kind of dumb/kind of awesome spotify mix of 90s-ish hip hop/r&b, so like GZA's shadowboxin', 2pac's california love, destiny's child's say my name, and tlc's waterfalls.

Saturday, June 16, 2012

curry chicken & mango salad


london, england is one of my favorite places in the world. i was lucky enough to live there twice (briefly) - once on a semester abroad and then for 6 months soon after i graduated from college. coming back after that 6 months was almost physically painful. every day for the next more-than-a-year i actively missed the city and cursed the work visa restrictions that had sent me home. 

now it's been TEN years since i was there (!). i still can't really believe it, but a combination of no money and little time (among other things) has kept me from going back to visit. i'm hoping to go soon, though, once i start raking in the big lawyer cash (ha! just kidding! i specialized in public interest law like a sucker!). now that i have several dear friends living there, it's become even more of a priority, so ojala i'll be visiting ye olde towne sooner rather than later.


in the meantime, i can make things like this curried chicken salad and pretend it's coronation chicken. during my after-college stint there, i worked as a medical secretary in an oncology hospital in central-ish london. it was somewhat depressing work, as can be imagined, but it paid well and everyone i worked with was charming. there was also an adorable little park nearby and virtually every day i would go to the pret a manger and get a sandwich, then go to the park and read. they had several iterations of coronation chicken which i never got to try, since i was a vegetarian then. but they probably weren't as good as this version, anyway, so hopefully i didn't miss out too much. 


start with perhaps a cup and a half or two cups of bite-sized-ed chicken. i like to use some white meat and some dark, because that's how i roll (flavorfully and with pleasing texture), but you can use whatever. it could be roasted or poached or even grilled. usually i just roast some bone-in breasts and drumsticks in the oven for one dinner, then use the leftovers for salad. 


i only used half a mango for this batch, but more wouldn't be bad. cutting up a mango is easiest if you slice down one of the flatter sides of it, use a knife to score the flesh in whatever size you'd like, making sure not to cut through the skin, then push it sort of inside out so you can just slice the cubes off the skin part. you probably want to cut it into pieces a little smaller than those above.

then just mix everything together, let it sit for a bit to meld the flavors better, and pile it on a sandwich or in a pita or have it with crackers or little toasts or even stuffed into tomatoes, once they get really summer-good. the curry isn't overpowering, but it's a welcome change from regular chicken salad and the sweetness of the mango and slight tartness of the yogurt are really nice. it's basically a perfect summer salad. whether you imagine yourself in london when you eat it is up to you. 


~ 1 1/2 - 2 cups chopped cooked chicken (i used about 2/3 of a large breast + 2 drumsticks)
1/4 cup each mayo and yogurt
salt
1/8 tsp cumin
1/2 tsp curry powder
juice of 1/2 a lime
1/2 a mango
handful cilantro
4 or 5 thinly sliced scallions


listening to: the herbaliser, solex

Wednesday, March 14, 2012

two quick/easy/healthy lunches

whether you bring your lunch to work or eat lunch at home or school, making it is one of those hassle-y things that you either sigh and do or sigh and don't do and then you end up buying a sub-par sandwich from the little shop on the ground floor of your office building.

wait, i guess that's only related to the bringing-your-lunch-to-work thing. and it's really only related to my work, because probably not everyone is lucky enough to work in office buildings containing shops with mediocre sandwiches on the ground floor.

anyway, i've never been that into making lunches. but i try to do it, because on tuesdays and thursdays i have to be Out and About for like 13 hours so if i don't make one i get into the whole sandwich shop malarkey and am mad at myself later.
two lunches that have been treating me right lately are a beans/kale/tomato melange and a vaguely asian chicken and broccoli thing. both are super quick and quite tasty and they will power you through any number of meetings, memos, or research rabbit-holes you find yourself falling into.

kale is probably my favorite green. it's milder than other greens like mustard or chard and it has more texture and heft than boring old spinach (which also has the non-benefit of making my teeth feel weird - thanks oxalate, you jerk!).

anyway, for this you just need one bunch of kale (washed, stems removed, and chopped into vaguely bite-sized pieces - 1"-2" or so), some garlic and/or shallots or onion, a can of white beans, and a can of diced tomatoes. heat a teaspoon or so of oil in a large pan (medium heat), then add the garlic/shallot/onion. let these cook for a minute or so, then add the kale. stir it around a bit and let it go for another two minutes-ish, then add the tomatoes (with their juice) and the beans (drained and preferably rinsed, because that bean-juice in cans is so nastily viscous). then you are basically done. let it cook, stirring occasionally, for perhaps another 10 - 15 minutes or until the kale becomes texturally pleasing to you. that's it! maybe also add some salt. a little lemon juice or cider or balsamic vinegar is nice, too.

the great thing about this is that it's vegan and it has lots of protein and vitamins. you can also grate a little cheese on it if you're feeling frisky. we had some cotija cheese that went particularly well with it, but asiago or parmesan would also be nice. it's also good warm or at room temperature, so if you can't stand the thought of hanging in the breakroom with your homies, you can hunch over it in your cubicle while reading a magazine. your choice!

here are the ingredients of my lunch today. i roasted a chicken the other day, so we already had some cooked leftovers. if you don't have a roast chicken in your fridge, you could always get one of those rotisserie ones or use tofu or add the extra step of cooking up a chicken breast. but it's definitely quicker if you have chicken that's already cooked. obviously.

other than that you just need a stalk of broccoli, a couple of cloves of garlic, a shallot (or equivalent amount of onion, or just leave it out), and perhaps half a jalapeño or other pepper (this one was mild). you can also add whatever else you have around - scallions and/or cilantro would be nice, as would some peanuts or cashews. but lo! i had none of those.

this is actually kind of similar to the kale thing in that you cook the garlic and whatever (here, shallot and jalapeño) for a hot minute, then add the green stuff (broccoli!) and let it cook for a bit. once i put the broccoli in, i added a tablespoon or so of water and then covered the pan and let it steam-cook for about two or three minutes. basically from here on out it depends on how crunchy you want your broccoli to be. i think mine cooked for a total of 7 or 8 minutes. the timing also depends on how large your broccoli chunks are - the smaller they are, the faster they cook.

once it's just about done, add some soy sauce (to taste, but maybe 1-2 teaspoons) and a teaspoon or so of sesame oil. then add the chicken (if you're using tofu, you could add it soon after the broccoli or cook it separately so it gets sort of crunchy) just to let it get all melded with the other stuff. also, incidentally, i was eating this at home, so i wanted to get it heated through. yay for home-lunch!

when you're ready to eat, a dollop of chili-garlic sauce is a great addition, as is sriracha, if you haven't already used it all up in some terrible apocalypse drink.

if you're taking it to work, you'll probably want to keep it cold until you're ready to eat it because salmonella.

*ingredients for kale thing*
1-2 cloves garlic
1 shallot or 1/4 of an onion
1 small bunch kale
1 can white beans
1 can diced tomatoes
salt
balsamic or cider vinegar, optional
cheese, optional

*ingredients for chicken-broccoli thing*
2 cloves garlic
1 shallot or 1/4 of an onion
1/2 mild jalapeño or other chili or some red bell pepper
1 largish stalk broccoli
1/3 - 1/2 cup chopped, cooked chicken
soy sauce and sesame oil, to taste
chili-garlic sauce and/or sriracha, to taste
other good additions - sesame seeds, nuts, other vegetables

listening to: the clientele

Saturday, October 1, 2011

simple cozy brown bread

so it's officially fall now. grey days may still be slightly outnumbered by sunnyish ones, but the ratio is definitely heading toward portland's traditional parade of grey from october to may.

which is fine by me, actually. when it's grey and chilly out, there is nothing better than making yeasty brown bread. it fills the house with delicious smells and the joy of eating fresh homemade bread cannot be overstated.

this is a versatile little loaf, too. sometimes i make it with part rye flour, sometimes i use more molasses, sometimes i add some oats for part of the flour. i also like to set a little bit of dough aside in the fridge and add it to the next batch, like an ersatz sourdough starter.

the best thing about the bread, though, is that it is as simple as the proverbial pie (which, come on, is not that easy). you can let it rise for as little as 20 minutes, but i usually give it at least an hour or so. you could also mix it up the night before, leave it in the fridge for awhile, and let it warm up and rise for an hour or two the next afternoon and then bake it. whatever you want!

i got the initial recipe from the guardian. i've fiddled around with it a bit, but the recipe as is is plenty delicious. i do appreciate that english recipes tend to use weights for measurements - it makes it roughly 100% easier to switch things with no ill effects.

first, you bloom the yeast in warm water and molasses. i use one whole packet of that yellow-packaged active dry yeast. in the original recipe, it says that the water should be "at blood heat," which, while vaguely creepy, is probably about the temperature you want - lukewarmish. it also calls for black treacle, which is not something i normally come across here. so i used some blackstrap molasses (the strong molasses) and, because i like those really dark sort of sweet breads, i usually use at least a tablespoon or so instead of the meager teaspoon called for originally.

just mix 1/2 cup of warm water, the packet of yeast and the molasses and let it sit for 10 minutes or so. the yeast gets all excited and froths up, so don't mix them in something too small.

while you're waiting for the yeast to do its weird thing, mix up the rest of the ingredients - 1 pound of flour (either all whole wheat or part wheat and part other flour, like rye - experiment!) and a teaspoon (or a little more) of salt. i did one of those online conversion things that said that 1 pound of wheat flour is about 3 3/4 cups, but you'd really be better off just getting a scale. it's much easier and better for switching up flours, since it's more exact. but otherwise, i think you could go with a little under 4 cups of flour and be fine.

once the yeast has foamed nicely, add that mixture and another cup of warm water to the flour and salt. get it all mixed nicely and pour/scrape (it will be pretty wet, for bread dough) it into a greased loaf pan. i like to line the pan with some parchment paper - it makes it easier to get the finished loaf out. then let it sit for awhile in some warm place. the original recipe says just 20 minutes, but i think it should go for at least an hour.

this is also the point at which you could save a little knob of dough for the next batch. i don't know if it really makes a difference in the taste, but the idea appeals to me and i usually do this. i keep it in the fridge in an old olive jar and have used it 2 weeks after it was made with no ill effects. just add it to the new loaf when you stir the water and yeast mixture into the flour and salt.

it rises pretty well over the course of an hour, but this isn't one of those super-rising loaves. it's meant to be a more dense, thick-textured one, like the knobby wool sweater of breads. hmm, that doesn't sound as complimentary as it was meant to. but that's the kind of bread i want on chilly fall days.

preheat the oven to 450 and bake the bread for 20 minutes, then turn the oven down to 400 and let it bake for another 45 minutes + (it should sound sort of hollow when you tap the bottom of the pan). let it cool in the pan for a bit and then set it on a rack to cool fully. you can also take it out of the pan about 5-10 minutes early and set it back in the oven - it gets the crust crispy. but it is also kind of a hassle. so.

they always tell you not to cut warm bread because it something something ... whatever, i am not physically able to resist cutting warm bread. after you make homemade bread, it's an imperative. i mean, don't cut it straight out of the oven, sure, but i rarely wait more than 20 minutes or so before following the siren song of malty, yeasty goodness.

this bread's as good with tea and jam as it is with pimento cheese, salty butter and crisp radishes, or cream cheese, smoked salmon, and capers. in short, it is good with everything. when toasted and well-buttered, it makes a particularly fine accompaniment to soup.

i think i know what we're having for dinner...

*ingredients*
1 packet yeast (the original recipe has a measurement for fresh yeast, if you want to go that route)
1 1/2 cups water, divided
1 tablespoon blackstrap molasses (or you could use wuss molasses, if you like)
1 lb (450 grams, or ~ 3 3/4 cups) whole wheat flour (or mix of flours)
1 teaspoon or 2 salt

Sunday, September 25, 2011

fish sauce drumsticks

mmm, these drumsticks are pretty great, i have to say. i've made them three times in the last couple of weeks, which is really saying something because generally the only thing i make that frequently is bean & cheese tacos (the house go-to for quick simple dinners).

they were inspired by the fish sauce chicken wings at pok pok, which is a pretty well-known thai place here in portland. people go nuts for those things, which is justifiable, because they are delicious. i wanted to try to do a similar thing but with drumsticks and without deep frying. this is because drumsticks are a little meatier and less pointless than chicken wings and because i am afraid of deep frying.

drumsticks are pretty cheap, too, even when you buy cuddled-to-death free range ones. for these pictures, i used the toaster oven because it was hot at the time. i have to really recommend that you use a regular oven though - it does a much better job crisping the skin.

so roast some drumsticks at 400 for about 40 minutes. i salt and pepper them a little bit first.

while that's going on, you can make the delicioso glaze/sauce.

this was what i used for the first batch. it was great, but i subsequently used brown sugar instead and i think that was better. brown sugar has molasses in it, which seems to caramelize better and add a little bitter note that is really good. i also added a tablespoon of honey in a subsequent batch and that's also something you should do.

first, chop up a couple of cloves of garlic. this is going to be fried in a little olive oil and will add some crunch at the end, so you don't want to totally mince it up all tiny. just get it into smallish chunks, like this (i should have put a quarter or something in there as scale. this is a large plate):

fry the garlic in a couple of tablespoons of olive oil - i set the heat on medium and let the oil get hot, add the garlic, and stir pretty much continuously until it gets nice and golden. you have to get it out of there pretty quickly after that to make sure it doesn't burn. i just use a spatula or spoon, but if you have a tiny sieve or something it might work better. you can save the oil for some other use - it will be nicely garlicky.

set the crispy garlic and the oil aside and you can use the same pan to make the glaze. it consists of 1/2 a lime's worth of zest and juice, another couple of cloves of garlic, either minced very fine or (preferably) grated on a microplane, about 1/3 cup of fish sauce, 1/4 - 1/3 cup brown sugar, a tablespoon of honey, and a teaspoon or more of sriracha and some chili flakes, if you're so inclined. cook this all together on medium heat, stirring often. it will start to boil pretty rapidly and get all caramelly. let it cook down a bit and get thick - maybe 6 or 7 minutes.

if you happen to be lucky enough to have a thermometer that isn't broken and half-filled with water, that's the best way to determine whether your chicken is done. otherwise, do the usual clear-juices-not-pink thing and hope you don't get food poisoning! good luck!

once the drumsticks are pretty much done and the skin is all nice and crispy, toss them in a large bowl with the glaze and the fried garlic bits (or you could pour the glaze on the pan and try to roll them around in it. this doesn't really work as well, though). then place them back in the pan and cook them a bit more so the glaze bakes in nicely - maybe another 10 minutes or so. i find that it's hard to seriously overcook drumsticks - they generally will stay pretty moist.

finally, sprinkle those puppies with some chopped cilantro and have at it. we've had them with salad, with rice and roasted broccoli, and on their own. each time they were delicious, but i think the rice and roasted broccoli were the best accompaniment, not least because you can roast the broccoli at the same time as the drumsticks.

this picture makes them look a little anemic, but when you are smart enough to roast them in a real oven they get really deeply caramelized, which is better. trust me.

*ingredients*

~ 1 lb chicken drumsticks (6 or so)
1/2 a lime's worth of zest and juice
3-4 cloves of garlic
1/3 cup of fish sauce
1/4 - 1/3 cup brown sugar
1 tablespoon (or so) honey (optional, but wonderfully sticky)
a teaspoon or more of sriracha and some chili flakes (optional)
cilantro (optional)

Saturday, September 10, 2011

beer-braised chicken, escarole, grapefruit, olives

wow, y'all, having a real-people job is tiring. i am totally not trying to complain, because i'm getting great experience in a field in which i want to practice, but man. once you add on the bus rides, i am suddenly gone for at least 45 hours a week. this has had a deleterious effect on the number of walkies the dogs get, as well as on my dinner-cooking.

the other day, however, i got off the bus for a brief 20 minute shopping expedition (so brief because that was the amount of time before another bus came). i wanted to make a quick and easy thing with some chicken thighs. they're great because they are more flavorful and less prone to drying out than are chicken breasts. also they're usually cheaper. so, bonus (especially since we always use humanely-raised chicken, which is more expensive but Worth It).

i decided to make a dish i think of as vaguely french - chicken sort of braised (in beer!) with oil-cured black olives, citrus, and greens. this time i used boneless, skinless chicken thighs, but it's great with regular ones. it just takes longer to cook. also sometimes instead of greens i use fennel and little potatoes. the citrus can be lemon or orange or something as well.

actually, i thought it was going to be orange in this dish, but what i remembered as an orange in our fridge turned out to be a grapefruit. luckily, it turned out to be more of a happy accident than a mistake, as the escarole and grapefruit really got along well. so well, in fact, that they are going to the movies this weekend and didn't even invite me. that grapefruit is such a friend-poacher.

who wouldn't love escarole, though? it shares a family line (chicory!) with things like endive, radicchio, and the chicory that so delightfully flavors new orleans-style coffee. like those other lovelies, it has a bit of a bitter edge that lets you know it means business. it's no baby spinach you're dealing with here.

but where cousin endive is a little buttoned-down and staid (all those leaves folded tightly together into a little bullet), escarole is frizzly and wild, letting its leaves go where they may with little regard for propriety. it's great in soups or as salad with maybe a hard-boiled egg vinaigrette and it's fantastic in this dish.

prep for this is really easy, as one would expect of any good weeknight dinner. just cut off the bottom stem thingy of the escarole and cut the leaves into about 1 inch lengths, moving up from the end.

the rest of the ingredients can be dispatched almost as simply. slice two cloves (or more) of garlic thinly and one medium shallot slightly less thinly. chop up some italian parsley. i actually leave the olives whole, but you could pit them if you want to be particularly fancy. use a microplane or similar to zest your citrus. i used the zest from about half of the grapefruit, as it's strong. if you use lemon, just chop it into eighths or something and don't bother zesting it first.

the citrus flesh (if you aren't using lemon) is the only part of this that could be a little fiddly. i like to cut the sections into supremes because i don't care for the membrane things around the meat part, especially when using grapefruit. if you want to just make thin slices going from pole to pole, however, i don't think it would be the end of the world. if you want to try your hand at supreming, here's a video. once you get the hang of it, it really doesn't take long.

once everything's cut up, heat a tablespoon or two of olive oil on medium-high heat in a pan large enough to hold all of the chicken thighs in one layer. once the oil's shimmery, add the chicken (put a little salt and pepper on it first). don't move it for a couple of minutes, then check a piece to see if it's browned. you're basically just trying to sear it, not cook it through at this point. flip once and brown on the other side. once both sides are brown, set the pieces of chicken on a plate to wait.

turn the burner down to medium-low (i think it was at about 5 on our dumb electric stove) and heat a little more olive oil if necessary. add the shallot, let it cook for 30 seconds or so, then add the garlic and let them both go for another 30 seconds. then add the escarole. as with so many greens, it'll look like a ridiculous amount when you put it in, but it wilts down a great deal as it cooks.

after about a minute or three (or whenever it starts looking a bit dry), add about half a bottle of beer. i used anchor steam, because that's what was in the fridge. i think any good normal beer would work. you probably don't want a stout or a miller chill, but anything in between would probably be good. i also sometimes make this with a dry white wine or some dry vermouth and chicken stock. so you have options, if you don't want to use beer. but the beer was really good in it.

then add the chicken back (i usually cut it into large chunks before this, so it cooks faster), as well as the olives and parsley, the zest, and the grapefruit. turn the heat down to lowish and let it cook partly covered for half an hour or so until the chicken is done. i usually just take a piece out and cut into it to check, but you could also use a thermometer to make really sure. taste the broth and add salt and pepper, if necessary.

this is good as a sort of stew, if you have lots of crusty bread to dip in the amazing sauce that forms when all of those bold flavors mix and mingle and get friendly-like. it would also be great on pasta or some little boiled potatoes. or rice. or quinoa.

basically, it's versatile, tasty and pretty quick. not too bad for a wednesday night dinner.

*the chicken in the picture above is a classic example of how you should do as i say, not as i do. i totally didn't sear the chicken first (although i usually do) and it was not as good. definitely go for the browning step. also you don't get a sense of how saucy this is because i had to take a picture before it was done. stupid early-setting sun.

*ingredients*
~ 1 pound boneless, skinless chicken thighs (or more, if you are using regular chicken thighs)
1 head escarole
1 citrus fruit (grapefruit, orange, lemon)
2 cloves garlic
1 medium shallot
10 + oil-cured black olives (usually available in the fancy-olive section of the supermarket)
1/4 or 1/3 cup chopped italian parsley
1/2 a beer or similar amount of wine, stock, etc.
salt and pepper to taste

Sunday, July 31, 2011

cooling salad with vegetables/tofu/rice

i went to a county fair on saturday! it was exactly what i expected and hoped for from a county fair - lots of adorable animals, fried foods, demonstrations of old-timey things, and various random 4-H projects like this:

the terrifying fellow above with his horrifying onion legs/pincers was part of a "best-dressed vegetables" competition, which sounds fake but is apparently a real thing. what's odd is that this hideous frankenstein's monster of pre-compost is not wearing any clothes. i assume that is why his creator only got a participation ribbon. next time follow the rules, poindexter!

on the opposite end of the cuteness spectrum is this darling. i immediately named her elmira velvet and she made it pretty clear that she wanted to come home with me. sadly, cooler heads prevailed and we left cowless.

(don't you just love her eyes?! and her softy soft coat? and her cunning little drool trails?!)

sadly what we did leave with were sunburns and mild heatstroke. well, i am not sure about the heatstroke. it wasn't that hot, but i was really out of it and tired when we got home. but i don't do outside things much, so perhaps i was just being a delicate flower.

regardless, the only thing that sounded good after the heat and dust and onion rings was this nice cold salad loaded with raw vegetables and herbs and tofu and slicked with a simple piquant dressing. it was heaven.

don't you feel 100 degrees cooler just looking at those vegetables? you can use whatever you have around - i used a red bell pepper, mint, half-ish of a jalapeño, jarred hearts of palm, some lemon balm that i fortuitously found growing in our backyard, a cucumber, some scallions, and some sugar snap peas (i also later put in some frozen peas and they thawed in the salad). i think blanched broccoli, tomatoes, little green beans, some basil and/or cilantro, etc, would all be good as well.

just slice the vegetables however you like - i made the scallions, hearts of palm, and jalapeño into kind of coin shapes (i took the seeds and most of the ribs out of the jalapeño and cut it in very thin rounds), the bell pepper into thick matchsticks, the herbs into julienne, and the peas i cut in half.

you could do the cucumber in rounds as well, but sometimes people get heartburn from the seeds, apparently, so i like to cut them in half and use a spoon to scoop the seeds out. you can then eat them, if you are not heartburn-prone, or you could use them to flavor ice water, etc - let them soak in it for awhile and then strain them out again. delicious! refreshing! or you can throw them away, i suppose.

then just slice the two halves into crescents.

it is probably not a bad idea to mix the dressing up in a big bowl and then dump the vegetables in. for a very large salad, i used like 1/4 - 1/3 cup rice vinegar, the juice of a whole lime, a tablespoon or so of demerara sugar (obvs you could use whatever kind), perhaps a tablespoon or so of soy sauce, and some sesame oil. basically it's a good idea to start slow and just add and mix until it tastes delicious. you want to be careful of the soy sauce, because it can be sort of overpowering. you could also just use some salt instead, if you don't want it soy-y. i mixed all of these up and then added the cut up vegetables.

then i added some leftover cooked white rice. i think it was about a cup and a half or two cups. but again, this was a monster salad. as you can see in the pictures, this is mainly a vegetable and tofu salad with rice in it, rather than a rice salad with other stuff in it. hopefully that makes sense. although clearly you can put a larger proportion of rice in. i am not going to come to your house and yell at you or anything.

i cut the tofu into ~ 1 inch cubes and let it sit in a strainer for a little while to get some of the moisture out. it was still pretty wet and pretty bland, however. i happen to like it that way, so i left it, but you could also put some paper towels around it and stack some plates or something on it to get it a little drier. you could also mix up the dressing and let the tofu sit in it for a little bit so it absorbs some. or you could use baked tofu. or like rotisserie chicken or something. basically the point is to avoid having to turn on the stove for any part of this.

this is very refreshing and is perfect for a simple lunch or dinner when it's too hot to think about stoves. it's got a good amount of protein, so it's filling. the crispness of the vegetables and the sourness of the lime and the herbiness of the herbs all go together well. it's also nice if you have some toasted salted nuts for on top - we used cashews, but peanuts would also be good. you want to put them on each serving individually, though, so they don't get soft.


*ingredients*
this is for a really large salad, so you can use less if you don't want to be eating it forever. it would also be a good potluck thing - it feeds a crowd and is both vegan and gluten-free, although check on the soy sauce - sometimes it can have gluten. the salad keeps well for a few days, although it was best soon after it was made.

1 bell pepper (preferably not green, because they are gross)
1 cucumber
1/2 jalapeño
1 bunch scallions
2+ big handfuls fresh herbs
2 cups sugar snap peas
1 cup frozen petite peas
3 or 4 hearts of palm

1 package extra-firm tofu
1 1/2 - 2 cups cooked rice

1 lime (or more, to taste)
1/4 - 1/3 cup rice vinegar
1 tablespoon sugar
soy sauce, to taste
sesame oil, to taste

Friday, June 24, 2011

japanese baked chicken katsu curry

somehow i never had japanese curry until last summer, despite my abiding love for all things curry. it was a revelation and now i crave it regularly. while i also love indian and thai curries, there's something different and particularly addictive about the japanese style. it's kind of sweet, but not in a coconut milk way. it's spiced, but not spicy. i don't know - basically it's just really good and i wish i was eating some right now.

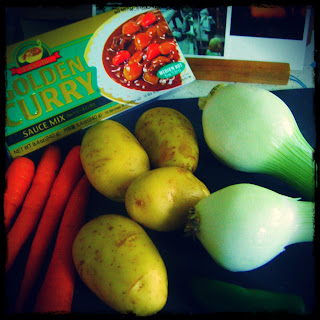
as the wikipedia link mentions, you can certainly make it from scratch, but people often use mixes.* i got this one from uwajimaya, which is an awesome asian market with all kinds of stuff, but it should be available at any asian market or at some supermarkets. i don't know that this is the best one around, but it was good enough for us. here is a link to a taste test of some - i will probably try another next time.

the traditional vegetables to put in the curry are potatoes, carrots, and onions (my onion was a farmer's market one, hence the little round slices at bottom right). i also added a sliced jalapeño this time and another time when i made it i used a small sweet potato as well. it's totally simple - just cut up the vegetables, as above, then cook the onion for a couple of minutes until it's translucent. then add the others and add however much water the curry roux box tells you to add. for mine, it was 3 cups of water for 1/2 the package. the curry comes in little blocks that you break up into the vegetables/water mixture once the vegetables are softish and basically done. then it thickens up and makes your house smell amazing.

you can add some kind of protein to the vegetables you use and have the whole thing over rice or noodles (which would be the best 15 minute meal ever), but i like making a version of chicken katsu to have with it. the curry can just sit for a bit while you make the chicken katsu, if you're doing that, or there is plenty of time to make that part while the chicken is baking.

usually katsu (which can be pork, beef, ham, chicken, etc) is breaded and deep-fried. i am kind of scared of deep frying things, and i don't have a thermometer for that kind of business, so i decided to just bread and bake some boneless skinless chicken thighs. Thighs are good for this because they are less likely to dry out than breast meat. also they are usually pretty cheap, even when you spring for the ones that are humanely raised and slaughtered.

the first time i made this i put the chicken into a plastic bag and smacked it a bit with the bottom of a heavy pan - i was trying to make it flatter so it would cook more evenly. i still think this is a good idea, but the next time i made it i didn't do that and we still ate it with gusto. so, your choice.

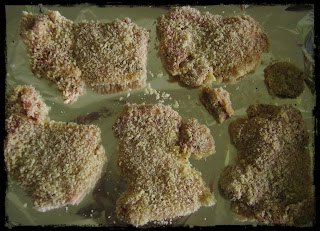
then you need to dip each piece in seasoned flour - just some salt and pepper will do. then have your station set up so you can dip into beaten egg (i used just one normal egg for a little over a pound of meat), then into seasoned (s+p again!) panko bread crumbs. the panko ones are great for this because they are bigger and scragglier than regular bread crumbs and they crisp up really well. i guess you could use regular bread crumbs, but panko is everywhere now so you should be able to find it easily in the supermarket (by the prole bread crumbs, probably. or in the asian section).

then just put them on a baking sheet and stick them in the oven for about 40 minutes or so. it depends on how thick they are, really. if you have a meat thermometer, use that to check the thickest part of the meat. otherwise, just cut into it and see if it is raw. if it is, cook it more! if this approach makes you nervous, probably you should spring for a meat thermometer.

you should probably make some rice at some point, too. we used jasmine rice that i just tossed in the rice cooker (best. invention. ever.), but you can use whatever kind.

sadly, i don't have a picture of the finished dish. this is for a number of reasons, such as that it was dark when we finally ate and also it is hard to take a picture of brown curry and vegetables and chicken and have it look pretty. so let's just say it looked exactly like this:

(imagine a very pretty katsu curry dish)

anyway, you get the idea. rice, vegetables in amazingly delicious curry sauce, crunchy chicken. it is the new favorite meal of our household and we love it lots. maybe you will as well!

*i should note that my friend who is half japanese was pretty strongly insistent on the need to make the roux yourself. but he has never given me a recipe to do so, so until that happy day comes, i'm sticking with this.

*ingredients* for like 6 servings? it depends on how hungry you are.
curry
1 large onion (or two medium ones or whatever)
4 small carrots (or like 2 carrots and some sweet potato, etc)
some potatoes - i used four mediumish ones
jalapeño (optional)
1/2 package japanese curry roux mix

baked katsu chicken
~1 pound boneless, skinless chicken thighs
~ 1/3 cup flour
salt and pepper to taste
1 egg
~ 1 cup panko bread crumbs (this is inexact, obviously, but you just want to really coat them well with the crumbs)